Setting a Pricing Formula for your Products
This video tutorials shows the process of setting a pricing formula for your products using our software. This way you can have multiple pricing tiers in case you have different exclusive offers.

Once you go into application settings, click products tab, and set your selling prices, you will be able to have different pricing formulas for you products. See the video below for instruction:
Setting a Pricing Formula for your Products
(Videos: See complete list of available videos)
Video Transcription
Hi, this is Michael Latham with Finale inventory in today’s video, we’re gonna discuss how to set up different price tiers for your products in Finale. So we’re going to want to start on the finale homepage and find our products tab. And today we’re going to be working with our red polo shirts. So we’re going to click into R-100 and to find pricing.
We’re going to want to scroll down to selling and find all of our pricing. So we see here, we have a $25 item price. Our item price is our default price in finale. Let’s set up some new prices for this product. Set up pricing in finale. We’re going to want to ahead to our application settings and find our product tab and scroll down.
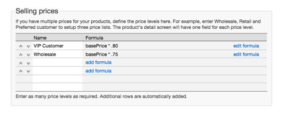
So we see selling prices. This is where you set up new pricing in finale. So we’re going to set up a wholesale price. So let’s just type that in really quick. And let’s say that this wholesale price is 80% of our item price. We can actually add that in here, following the blue link. And let’s say that this is 80%. This base price correlates to our item price. Let’s say it’s 80% of this and we’re going to multiply it by 0.80. And just add that in and we can actually test it below. So let’s put in our R-100 and say that we’re selling one and preview and yep, that equals 80% of our $25 item price. So that looks right. So we’re gonna go ahead and save and that’s all you need to do to set up a price here.
You’re also able to import pricing via spreadsheet. First, you just want to make sure that you set up your new selling price here. So we’re gonna do our V I P price. And now that that’s saved, we’re just going to head to our import screen import products. And I’ve already created a spreadsheet with our new pricing. So let’s head in here and we see here, we have our product ID and our VIP price already set up in our columns. So we’re just going to copy this data from our spreadsheet. Paste it in. So we see here that we’re getting green. So all of our products are looking right, and this is going to assign them a new VIP price.
And we’re just going click next and commit and click next. And that VIP pricing has been added in. So let’s go check out what our changes are. So let’s scroll down. So we see here that our item price is still $25. That’s correct. We see wholesale pricing has been added in and we see our VIP price has set the $17, like we have set up. So our import was successful and our pricing is correct.
I want to show you one last thing and that’s how you can assign price levels to customers. So we’re just going to head to our selling tab and find customers. Let’s say for Laura Winslow, we see here that she has a default price level of an item price. We can actually change this to our wholesale price. So I’m just going to select wholesale and save. So what does that mean? Let’s go into a sales order.
I just want show you really quick. If we create a brand new sales order, let’s just generate a brand new one. We see here, we don’t have a customer selected and it’s at that default, that item price. But if we select Laura, we see here that finale changes the price level to wholesale, which is correct. So what does that mean? If we go into our products and we add our R-100, which we know is $25, normally finale corrects it, the list price to be $20. So it’s added in that wholesale price level. So that’s how price levels affect customers. And that will conclude how to set up different price tiers for products and finale, please visit service@finaleinventory.com for any questions or inquiries.
Thank you.


